So that is how I ended up with a PLDT Ultera Modem. I didn't steal it or anything but I had to make use of it somehow wihout having to re-activate my PLDT Ultera Plan.

Tuesday, November 15, 2016
Re-use PLDT Ulterra Modem Without Hacking
I wouldn't have written anything about this blog if PLDT had not been irresponsibly sent me the SmartBro Pocket Wifi and charged me an additional 500 peso something on top of my existing plan. I had specifically told the customer service representative that I did not want another internet device because I am already contented with the LTE Modem that I already have and I also have a mobile Internet capable device on hand. I did, however, told them that I was OK with their forced migration from an Unlimited Broadband Plan to the new 30gig per month limit. He must have been confused or distracted and sent me the device anyways so I had it returned to PLDT the second day I had received the device. They still charged me the pocket wifi non the less so I got fed up and I didn't continue with their service.
So that is how I ended up with a PLDT Ultera Modem. I didn't steal it or anything but I had to make use of it somehow wihout having to re-activate my PLDT Ultera Plan.
So that is how I ended up with a PLDT Ultera Modem. I didn't steal it or anything but I had to make use of it somehow wihout having to re-activate my PLDT Ultera Plan.


Monday, August 24, 2015
PLDT ULTERA PLAN 999 Review
So it has been 12 months since I have subscribed to PLDT's ULTERA Plan 999 at 3 Mbps and here are my thoughts as a subscriber from Manolo Fortich, Bukidnon.

For the past 12 months subscribed to ULTERA Plan, the speed has not been constant. Most of the time, I hit 3 Mbps Download and Upload Speed of 1 Mbps which was what I was expecting from the plan. Browsing was fast and ping times were great. YouTube videos would load at 720p without buffering as shown from the video below which I posted last May 19, 2014 after just 3 Months subscribed.
Everything was fine except for the past Month, the speed had dropped from 3 Mbps to just 0.67 Mbps Download and Upload had also dropped from 1 Mbps to 0.41 Mbps as of August 24, 2015 7:54 PM.


Disappointing results I know. I could no longer watch YouTube videos like I did before. I am not sure if I am hitting my monthly quota but as far as I know, my usage is still the same. From the occasional YouTube Videos to Facebook, I have not changed my browsing habits.
I am no expert but as past experiences from a SMART WiMax and Smart Canopy Plans subscriber, which PLDT already owns, they tend to slow down overtime as the number of users grow. They do not scale up to how much subscribers are in the area. They keep the same pipes for a growing number of users and I really hope they do increase the capacity of their network otherwise their users would be complaining a lot about the speed.
Being an early adopter does have its perks, for one thing, I benefit from the speed because of the small number of users in the area.
All I can say for the PLDT ULTERA PLAN as of August 2015 when you are in Manolo Fortich, Bukidnon, don't go for it. Instead, try the competition's internet connection (I am talking about no other than GLOBE). Which may have a better connection for you as they slowly roll out their 4G LTE in our area. For now, PLDT is slow because the capacity of the network might be maxed out.
Wednesday, July 22, 2015
Galaxy S6 Review
This is not a full review of the galaxy s6. If you want a full review, you can head on over to youtube for that.
Instead, I will be talking about my experience with the Samsung's flagship phone, the Galaxy S6. This is just the regular s6 and not the edge.
After having the device for 3 months already and coming from a Galaxy Note 2, all I could say is that it is a great improvement from my previous device.

Visually, the phone looks great. With an all metal bezel and front and rear glass, you get to instantly feel that its a premium device. You would want to touch it without a cover because in my experience, gripping a real metal and glass phone is just amazing. You would not want to cover this phone up with a jelly case but you should for protection.

The display is amazing. The colors are vibrant and text is crisp. Thanks to the Super AMOLED Display with an awsome quad HD resolution of 2560x1440 pixels, you hardly get to see the pixels up close. Although I didn't complain about my previous device's 720p resolution, the new display was a great step in technology.
Now lets head on over to the other features that I like about this device. For security, it has a fingerprint sensor. For health, it has a heart beat monitor in the back with a step counter or a pedometer to count your steps as you go for a walk or run. And for your home, it has an IR blaster up top that you could use to control your TV and TV box.
Fast charging is also included so you don't have to wait hours before you get a 100% charge. Wireless charging is also already embedded so you get to use those fancy wireless charging stands that I have right here.

Now last but not the least, the camera. It boasts a 16 megapixel f1.9 camera. With the camera, you can capture some amazing shots indoors and outdoors with great clarity and great colors. I tend to use the auto mode a lot but if you want fine controls, there is also a pro mode. The photos below speaks for itself. They are not edited or have been added filters. They are as is and are straight from the camera.


The Samsung Galaxy S6 does meet the expectation of mine but I wouldn't mind an external SD card next time. For when you want to expand your storage.
Instead, I will be talking about my experience with the Samsung's flagship phone, the Galaxy S6. This is just the regular s6 and not the edge.
After having the device for 3 months already and coming from a Galaxy Note 2, all I could say is that it is a great improvement from my previous device.

Visually, the phone looks great. With an all metal bezel and front and rear glass, you get to instantly feel that its a premium device. You would want to touch it without a cover because in my experience, gripping a real metal and glass phone is just amazing. You would not want to cover this phone up with a jelly case but you should for protection.

The display is amazing. The colors are vibrant and text is crisp. Thanks to the Super AMOLED Display with an awsome quad HD resolution of 2560x1440 pixels, you hardly get to see the pixels up close. Although I didn't complain about my previous device's 720p resolution, the new display was a great step in technology.
Now lets head on over to the other features that I like about this device. For security, it has a fingerprint sensor. For health, it has a heart beat monitor in the back with a step counter or a pedometer to count your steps as you go for a walk or run. And for your home, it has an IR blaster up top that you could use to control your TV and TV box.
Fast charging is also included so you don't have to wait hours before you get a 100% charge. Wireless charging is also already embedded so you get to use those fancy wireless charging stands that I have right here.

Now last but not the least, the camera. It boasts a 16 megapixel f1.9 camera. With the camera, you can capture some amazing shots indoors and outdoors with great clarity and great colors. I tend to use the auto mode a lot but if you want fine controls, there is also a pro mode. The photos below speaks for itself. They are not edited or have been added filters. They are as is and are straight from the camera.


The Samsung Galaxy S6 does meet the expectation of mine but I wouldn't mind an external SD card next time. For when you want to expand your storage.
Tuesday, July 21, 2015
Web Designer from Manolo Fortich
Are you thinking about starting your own website for your business?
Have no fear for Francis is here. Your local online freelancer that can help you setup your first website.
If you want to contact me, just send an email at francisuan@gmail.com or drop by Hingcayog Store in front of Rural Bank of Manolo Fortich, Baranggay Tankulan, Manolo Fortich, Bukidnon.
Don't be afraid to put your business online because times have changed and you too adapt to the changing times. No need to go to Cagayan de Oro for your website needs because I am here.
I have an extensive portfolio of sites already published and running online that I am willing to show you if you wish to see my work.
This is me, if you are from Manolo Fortich then you might have seen this face.

Have no fear for Francis is here. Your local online freelancer that can help you setup your first website.
If you want to contact me, just send an email at francisuan@gmail.com or drop by Hingcayog Store in front of Rural Bank of Manolo Fortich, Baranggay Tankulan, Manolo Fortich, Bukidnon.
Don't be afraid to put your business online because times have changed and you too adapt to the changing times. No need to go to Cagayan de Oro for your website needs because I am here.
I have an extensive portfolio of sites already published and running online that I am willing to show you if you wish to see my work.
This is me, if you are from Manolo Fortich then you might have seen this face.

Wednesday, November 28, 2012
My Name In Adobe Illustrator
There is nothing more cooler than creating a designer text logo of your own name using Adobe Illustrator. Its so much easier and not to mention, nice to look at.
The one above is a cover photo for my Facebook profile. Not only does it look good but its totally different. I must be feeling all fired up when I created this one.
 |
| My Personal Facebook customized cover photo |
Tuesday, June 12, 2012
Connecting to Virtual PC's Internet Connection from Host
If you're like me who has a Windows 7 64bit computer with a broken LAN port and you purchased a usb lan card but does not have the driver's for it, then this article is for you.
I will teach you how you could still make use of your USB LAN adapter from within a virtual environment and access the internet from your virtual machine.
The first thing you will need is to download and install a virtual machine. You can download Microsoft's XP mode for Virtual PC or setup Oracle's Virtual Box and grab a Windows XP image on the net. I prefer installing Windows XP because of the JP1081 USB Lan adapter I have runs great on Windows XP. There are lots of tutorials on how to setup and install these virtual machines so go and Google it up because this article will not cover setting up the virtual machine.
Once your virtual machine is setup and running. Fire it up and plug in your USB Adapter and load it up on the virtual machine with all of its drivers installed of course on the virtual machine. Once the USB LAN adapter is working and properly running on your virtual machine, its time to setup the host computer.
First, setup a loopback adapter on your host computer.
On Windows 7, you go to Device Manager and under action click Add legacy hardware.

After the welcome screen, select Install the hardware that I manually select from list then click next. Pick Network Adapters and then in the Microsoft manufacturer click Microsoft Loopback Adapter.

Click finish and then wait for the new network adapter to show up in your Control Panel > Network and Internet > Network Connections folder.

It will show up as a Local Area Connection with a Microsoft Loopback Adapter Description. Right click the newly created network adapter and click on Properties. Edit the IPV4 settings and just use the settings below.


I will teach you how you could still make use of your USB LAN adapter from within a virtual environment and access the internet from your virtual machine.
The first thing you will need is to download and install a virtual machine. You can download Microsoft's XP mode for Virtual PC or setup Oracle's Virtual Box and grab a Windows XP image on the net. I prefer installing Windows XP because of the JP1081 USB Lan adapter I have runs great on Windows XP. There are lots of tutorials on how to setup and install these virtual machines so go and Google it up because this article will not cover setting up the virtual machine.
Once your virtual machine is setup and running. Fire it up and plug in your USB Adapter and load it up on the virtual machine with all of its drivers installed of course on the virtual machine. Once the USB LAN adapter is working and properly running on your virtual machine, its time to setup the host computer.
First, setup a loopback adapter on your host computer.
On Windows 7, you go to Device Manager and under action click Add legacy hardware.

After the welcome screen, select Install the hardware that I manually select from list then click next. Pick Network Adapters and then in the Microsoft manufacturer click Microsoft Loopback Adapter.

Click finish and then wait for the new network adapter to show up in your Control Panel > Network and Internet > Network Connections folder.

It will show up as a Local Area Connection with a Microsoft Loopback Adapter Description. Right click the newly created network adapter and click on Properties. Edit the IPV4 settings and just use the settings below.

Pay attention to the default gateway as this will be the IP of your Virtual Machine's Internal network. The DNS server addresses are from Open DNS and you can use any DNS server you want. Click on OK to save your settings.
You have finished setting up your host, now we setup the Virtual PC's network to talk to your host.
First, open the networking setup of your virtual PC. On Virtualbox, you click on Devices and Network Adapter.

On network select Bridge Adapter on the Attached to and select Microsoft Loopback Adapter, the name of the Lan Adapter we just created earlier.

Click OK to save your settings and wait for the virtual machine to update its network adapters.

Your virtual machine should have these settings on its Network Adapters folder.
You should have internet connection enabled by now on the virtual machine. Try opening the virtual machine's browser and check if you have internet connection.
We now then have to configure the virtual machine's LAN Adapter with these settings.

Take note of the default gateway. This is the IP of your host computer. Your host computer's loopback adapter's default gateway should also be your virtual pc's IP. The host and Virtual PC should not have the same IP's. Click OK to save your settings and you are done!
Verify if you have connection by pinging your virtual pc from the host and also pinging your host from the virtual pc. Also try to ping a website from your host and check if there is a connection.
Friday, August 5, 2011
Smart WiMax vs Canopy Plan 999: Speed Comparison
 |
At my disposal are two of SMART's SMART Bro line of broadband products which is the SMART Bro WiMax Plan 999 and SMART Bro Canopy Plan 999. This blog demonstrates the speeds of both internet solutions with image links direct from speedtest.net. For the download speed, I dowloaded a 90 megabyte video card driver file from AMD and screen captured after a minute of download. For the upload, I uploaded a 35 megabyte file to my skydrive and screen captured after a minute of upload as well. These are the results.
SMART Bro WiMax Plan 999:
Speedtest


Actual Download Speed
(click to enlarge)

Actual Upload Speed
(click to enlarge)

SMART Bro Canopy Plan 999:
Speedtest


Actual Download Speed
(click to enlarge)
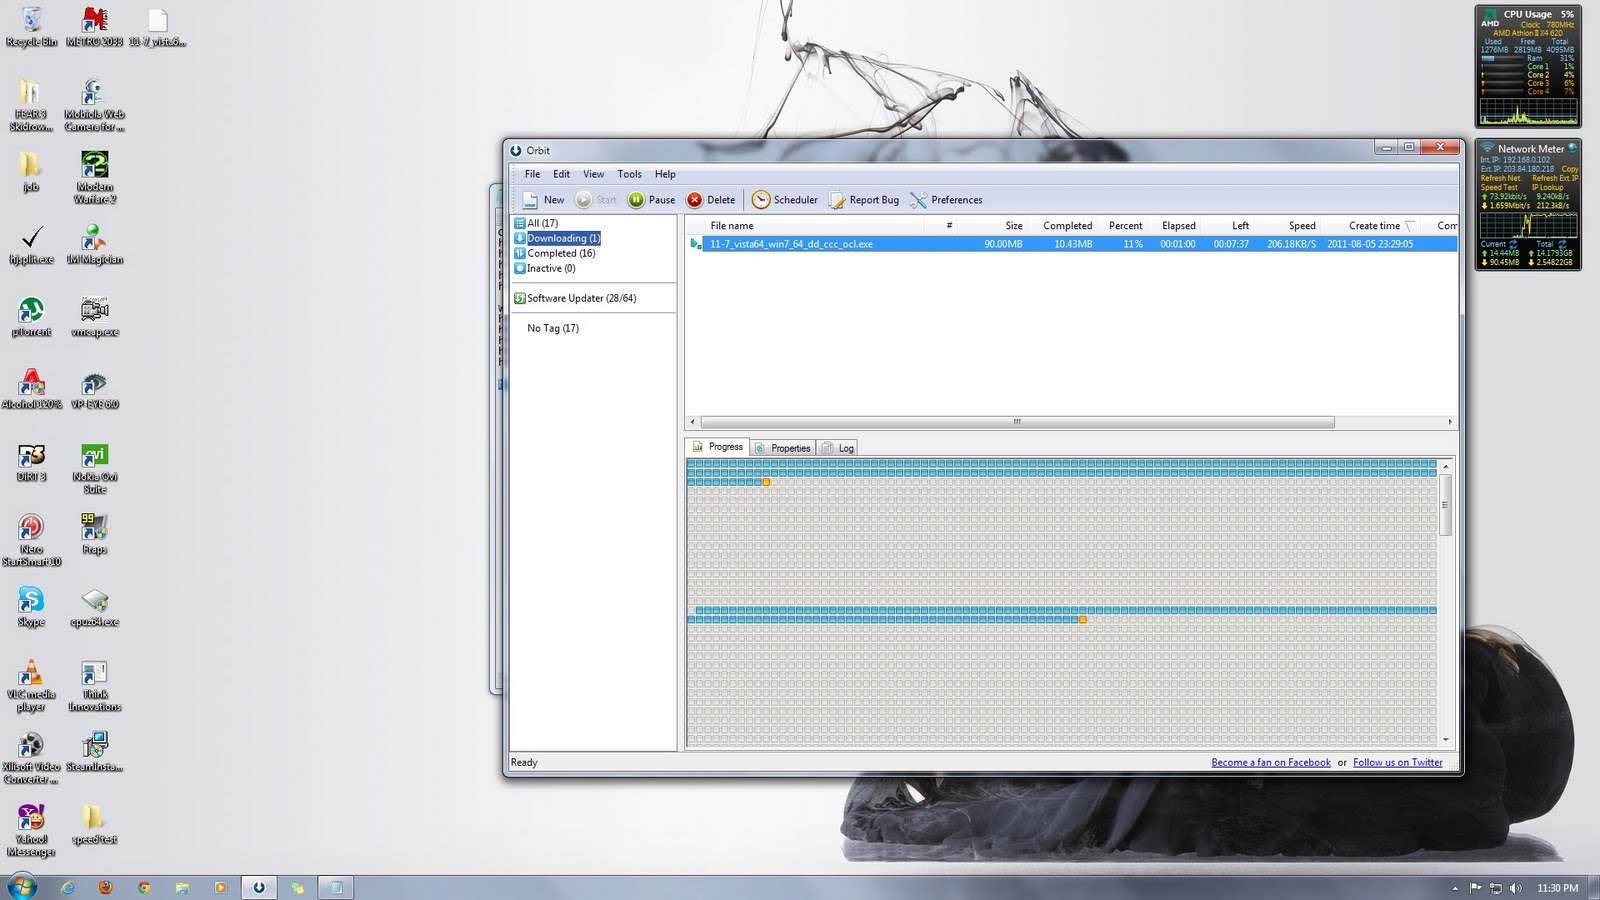
Actual Upload Speed
(click to enlarge)

SMART Bro Canopy Plan 999 is faster than the the WiMax Plan. Although the speed tests were almost at par with one another, the actual speed test of the upload and download speed for the canopy plan is still twice as fast as the WiMax' upload and download speed.
Tuesday, May 24, 2011
Google Maps v3 Update with Smooth Zoom
 |
| Bing Maps |
 |
| Google Maps |
I think Google is amping up its Google maps service after a recent announcement that Bing Maps, powered by Navteq, will start on it's Streetside which will rival Google's Streetview. But whatever it is, Google is serious about making it's Google Maps better than the competition. And with better product support and more developers favoring the Google Maps platform on website which I use myself in some website projects, I'm sure Bing has a lot of catching up to do in terms of product support and developer interest.
Monday, May 23, 2011
Charge via USB On the Go on the Nokia N8 and E7
The new Nokia N8 and E7, with its USB on the Go feature, can charge devices via USB. Just plug any USB charging capable device on the Nokia N8 via the shipped USB on the Go cable attachment for the Nokia N8 and E7. Instead of having to buy a separate battery pack where you can plug in USB devices to charge it from, why not try charging via USB on the Go.
The latest cellphones from Nokia such as the the C-Series phones and Symbian 3 devices can charge via USB using their USB cables. To charge, just set any device into mass storage mode in the enhancements settings and plug it in the USB on the Go cable attached to the Nokia N8 or E7. The downside is that the battery of your Nokia N8 or E7 will also drain so use it whenever you really need to.
Other USB devices can also charge via way of USB such as portable Mp3 Players. You can also sync music on the go while charging via USB because most modern Mp3 players such as your IPOD charges via USB.
So for that needed charge on the go, charge via USB on the Go for the Nokia N8 and E7 models. You can never run out of juice ever again.

The latest cellphones from Nokia such as the the C-Series phones and Symbian 3 devices can charge via USB using their USB cables. To charge, just set any device into mass storage mode in the enhancements settings and plug it in the USB on the Go cable attached to the Nokia N8 or E7. The downside is that the battery of your Nokia N8 or E7 will also drain so use it whenever you really need to.
Other USB devices can also charge via way of USB such as portable Mp3 Players. You can also sync music on the go while charging via USB because most modern Mp3 players such as your IPOD charges via USB.
So for that needed charge on the go, charge via USB on the Go for the Nokia N8 and E7 models. You can never run out of juice ever again.

Get Paid to View Ads
Why not get paid to view ads by going to Onbux.
Onbux is a site where you get paid viewing ads and sending referrals to other people.
Tired of having to refer people via blogs and other means, Onbux has a referrals rental where you can rent referrals for a very affordable package. The more referrals, the better. Cash out is also at least $2 so be sure to rack up on referrals so that you get paid.

Onbux is a site where you get paid viewing ads and sending referrals to other people.
Tired of having to refer people via blogs and other means, Onbux has a referrals rental where you can rent referrals for a very affordable package. The more referrals, the better. Cash out is also at least $2 so be sure to rack up on referrals so that you get paid.
Thursday, September 24, 2009
How to Clean a Radeon HD2600 Pro Video Card Fan
Video cards are what powers our games in our PC. They sit on the motherboard working itself off to render feature rich content in games and in videos. These cards eat up so much power that some video cards needs to be supplied separately with power from the power supply. Video cards need to be cooled by either a heat sink or a fanned cooler.
In our example; the Radeon HD2600Pro from Tul Corp., has a fan cooler as the cooling for the video card. The fan cools the video card by forcing in air to cool the card. In this process, dust gets accumulated in between the moving parts thus hindering the fan from working. When the fan stops, cool air will not flow over the heat sink and will cause major damage to the card when operating.

1. The first step is to remove the video card from the motherboard so that the fan can be taken apart and cleaned. Be sure to unplug your computer before doing so and be really careful when detaching the video card from the motherboard to prevent damage to the card and to the motherboard. When the video card has been removed, place it on top of a clean surface.

2. After removing the video card from the motherboard, we then take it apart by first unscrewing the three(3) screws that holds it on the metal heat sink. Be sure to unscrew carefully to prevent any damage to the fan and its small plastic fan blades.


Subscribe to:
Posts (Atom)
Clixsense
