Friday, August 5, 2011

Smart WiMax vs Canopy Plan 999: Speed Comparison

Smart Bro Wimax vs Canopy


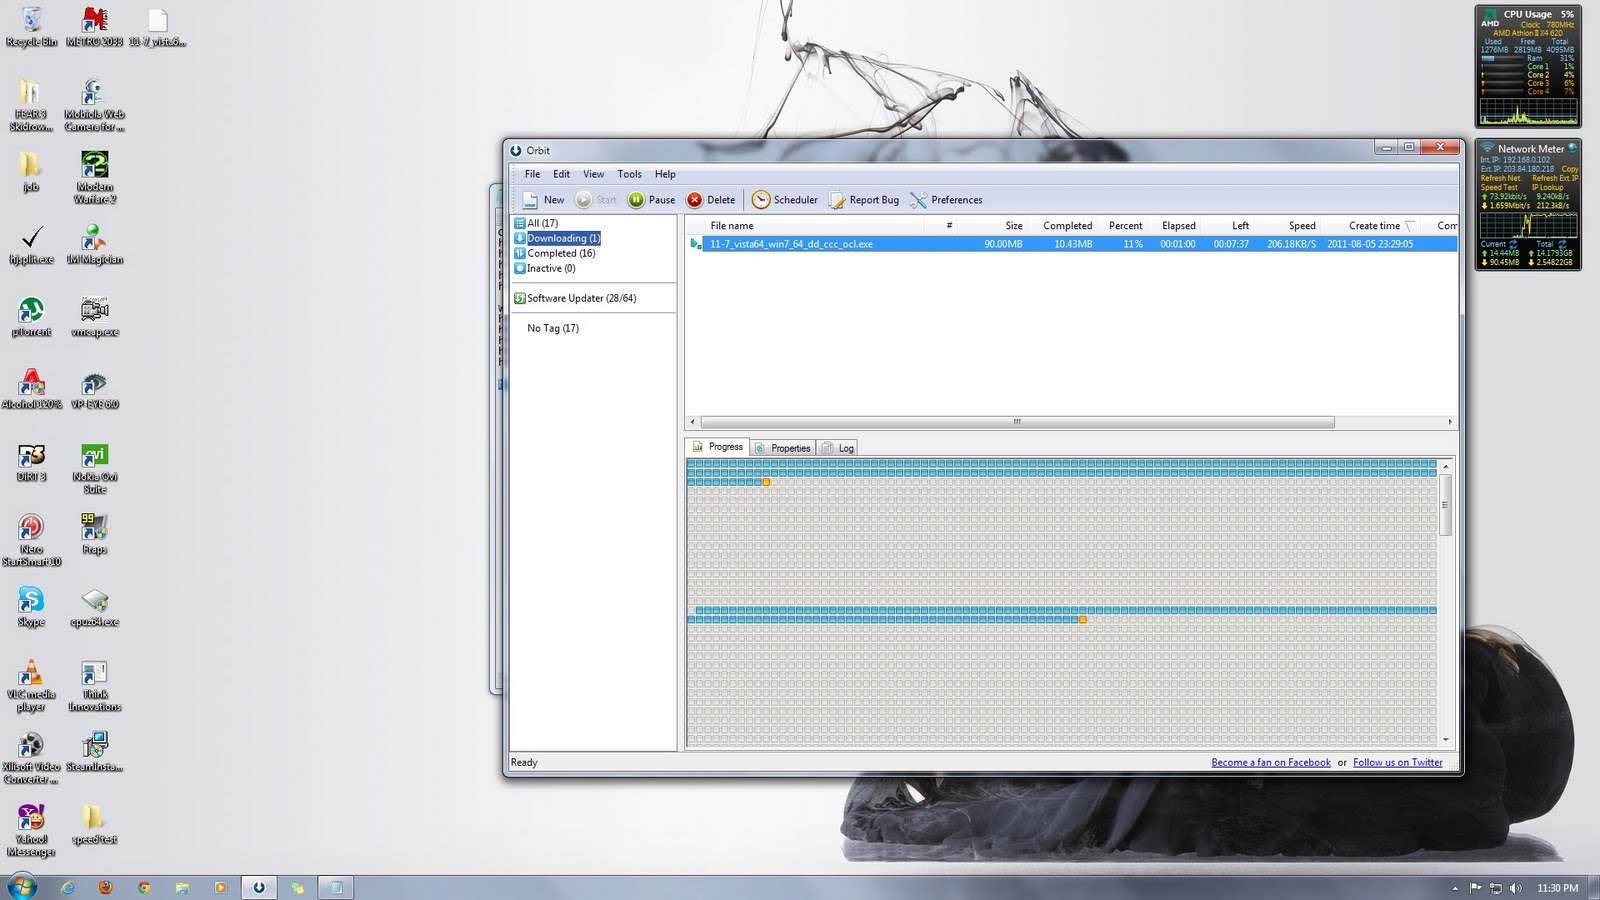
At my disposal are two of SMART's SMART Bro line of broadband products which is the SMART Bro WiMax Plan 999 and SMART Bro Canopy Plan 999. This blog demonstrates the speeds of both internet solutions with image links direct from speedtest.net. For the download speed, I dowloaded a 90 megabyte video card driver file from AMD and screen captured after a minute of download. For the upload, I uploaded a 35 megabyte file to my skydrive and screen captured after a minute of upload as well. These are the results.

SMART Bro WiMax Plan 999:
Speedtest
smart bro wimax speedtest
Actual Download Speed
(click to enlarge)
smart bro wimax download speed
Actual Upload Speed
(click to enlarge)
smart bro wimax upload speed

SMART Bro Canopy Plan 999:
Speedtest
smart bro canopy speedtest
Actual Download Speed
(click to enlarge)
smart bro canopy download speed
 Actual Upload Speed
(click to enlarge)
smart bro canopy upload speed

Conclusion:
SMART Bro Canopy Plan 999 is faster than the the WiMax Plan. Although the speed tests were almost at par with one another, the actual speed test of the upload and download speed for the canopy plan is still twice as fast as the WiMax' upload and download speed.

Tuesday, May 24, 2011

Google Maps v3 Update with Smooth Zoom


Bing Maps


Google Maps
Have you seen Google Maps version 3 implemented websites lately? Then you might have noticed something different. One that you have seen before in Bing Maps which is smooth zoom. (example here). Smooth zoom makes zooming in and out of maps more visually appealing than with their old implementation which is just boxes loading in the side of the map whenever you zoom in and out of the map. It makes it a whole lot easier to determine where you are going to or moving away from the map. As you zoom in and out, the texts, roadways and even the landmarks gracefully fade into view or fade out depending on whether you are zooming in or out of the map. This is more visually appealing than with the old Google maps as shown here where it doesn't fade in and out landmarks and texts into view.


I think Google is amping up its Google maps service after a recent announcement that Bing Maps, powered by Navteq, will start on it's Streetside which will rival Google's Streetview. But whatever it is, Google is serious about making it's Google Maps better than the competition. And with better product support and more developers favoring the Google Maps platform on website which I use myself in some website projects, I'm sure Bing has a lot of catching up to do in terms of product support and developer interest.

Monday, May 23, 2011

Charge via USB On the Go on the Nokia N8 and E7

The new Nokia N8 and E7, with its USB on the Go feature, can charge devices via USB. Just plug any USB charging capable device on the Nokia N8 via the shipped USB on the Go cable attachment for the Nokia N8 and E7. Instead of having to buy a separate battery pack where you can plug in USB devices to charge it from, why not try charging via USB on the Go.

The latest cellphones from Nokia such as the the C-Series phones and Symbian 3 devices can charge via USB using their USB cables. To charge, just set any device into mass storage mode in the enhancements settings and plug it in the USB on the Go cable attached to the Nokia N8 or E7. The downside is that the battery of your Nokia N8 or E7 will also drain so use it whenever you really need to.

Other USB devices can also charge via way of USB such as portable Mp3 Players. You can also sync music on the go while charging via USB because most modern Mp3 players such as your IPOD charges via USB.

So for that needed charge on the go, charge via USB on the Go for the Nokia N8 and E7 models. You can never run out of juice ever again.

Get Paid to View Ads

Why not get paid to view ads by going to Onbux.

Onbux is a site where you get paid viewing ads and sending referrals to other people. 


Tired of having to refer people via blogs and other means, Onbux has a referrals rental where you can rent referrals for a very affordable package. The more referrals, the better. Cash out is also at least $2 so be sure to rack up on referrals so that you get paid.


Thursday, September 24, 2009

How to Clean a Radeon HD2600 Pro Video Card Fan


Video cards are what powers our games in our PC. They sit on the motherboard working itself off to render feature rich content in games and in videos. These cards eat up so much power that some video cards needs to be supplied separately with power from the power supply. Video cards need to be cooled by either a heat sink or a fanned cooler.

In our example; the Radeon HD2600Pro from Tul Corp., has a fan cooler as the cooling for the video card. The fan cools the video card by forcing in air to cool the card. In this process, dust gets accumulated in between the moving parts thus hindering the fan from working. When the fan stops, cool air will not flow over the heat sink and will cause major damage to the card when operating.

To prevent damage, we will need to clean the cooler of this video card. The steps are:

1. The first step is to remove the video card from the motherboard so that the fan can be taken apart and cleaned. Be sure to unplug your computer before doing so and be really careful when detaching the video card from the motherboard to prevent damage to the card and to the motherboard. When the video card has been removed, place it on top of a clean surface.


2. After removing the video card from the motherboard, we then take it apart by first unscrewing the three(3) screws that holds it on the metal heat sink. Be sure to unscrew carefully to prevent any damage to the fan and its small plastic fan blades.


3. After all the screws are out, take out the stopper. This is a small piece of rubber that holds the wire of the fan neatly in place on the heat sink.

4. Unplug the fan by gently pulling it out of the socket. Now, you have all the main parts separated ready to be cleaned by hand. Do not try to remove the heat sink, the big piece of metal, from the video card to prevent the thermal gel from being rubbed off unless you happen to have a tube of thermal gel lying around then you can clean the whole sink and place it back on top of the processor but don't forget to apply thermal gel on the processor before putting the heat sink back on top.

5. Start cleaning the heat sink by using a clean brush to sweep of the dust that has accumulated on the heat sink. Also brush in between of the fans's fan blades.

6. You will also need to oil the motor of the fan to give it lubrication for the fan to start working again and turn effortlessly. You can also use oil to protect the heat sink against rust and to wipe the card clean. Turn the motor to check if it is lubricated and that it turns effortlessly.


7. After everything is done, put it all back together starting with fan and by putting it back into the computer. Be careful in using screw drivers as this may scratch the delicate surface of your video card.


8. Place it back into the PCI Express Slot and plug-in your computer. Before closing the computer case, see if the small fane is working fine and that it is turning correctly.

Computer cleaning is quite easy especially with all instructions found on the internet. I do hope that you will find this post very informative.

Clixsense